You can create discounts using talech Register or on talech.com. This article will show you how to create discounts from talech.com. To learn more about creating discounts on talech Register, see the article Discounts.
In this article
Choosing the right discount for your customers
Create a discount
Additional discount settings
How customers see your discounts
Choosing the right discount for your customers
There are 5 types of discounts you can create:
- Percentage: discounts the price of eligible items by a defined percentage.
- Dollar Amount: discount the price of eligible items by a defined dollar amount.
- Price Markdown: Set a fixed sale price for a select group of items.
- Amount Off Total: Takes a one-time dollar amount off a total order.
- Buy X Get Y: Adjust the price of an eligible item if certain requirements are met. For example, “buy one, get one” type discounts.
Then, you can apply those discounts in 3 distinct ways from your point of sale.
- Line-item discounts: Stand-alone or one-off discounts applied to an order at checkout.
- Discount buttons: Pre-set discount for your menu that can be added to an open order (lunch special, combo deals, 10% off, etc.).
- Automatic discounts: Discount that is automatically applied to an order or product when certain criteria are met (happy hour, buy-one-get-one).
Create a discount
- Log in to talech.com.
- Select Items > Discounts from the left navigation menu.
- Select the New Discount button.
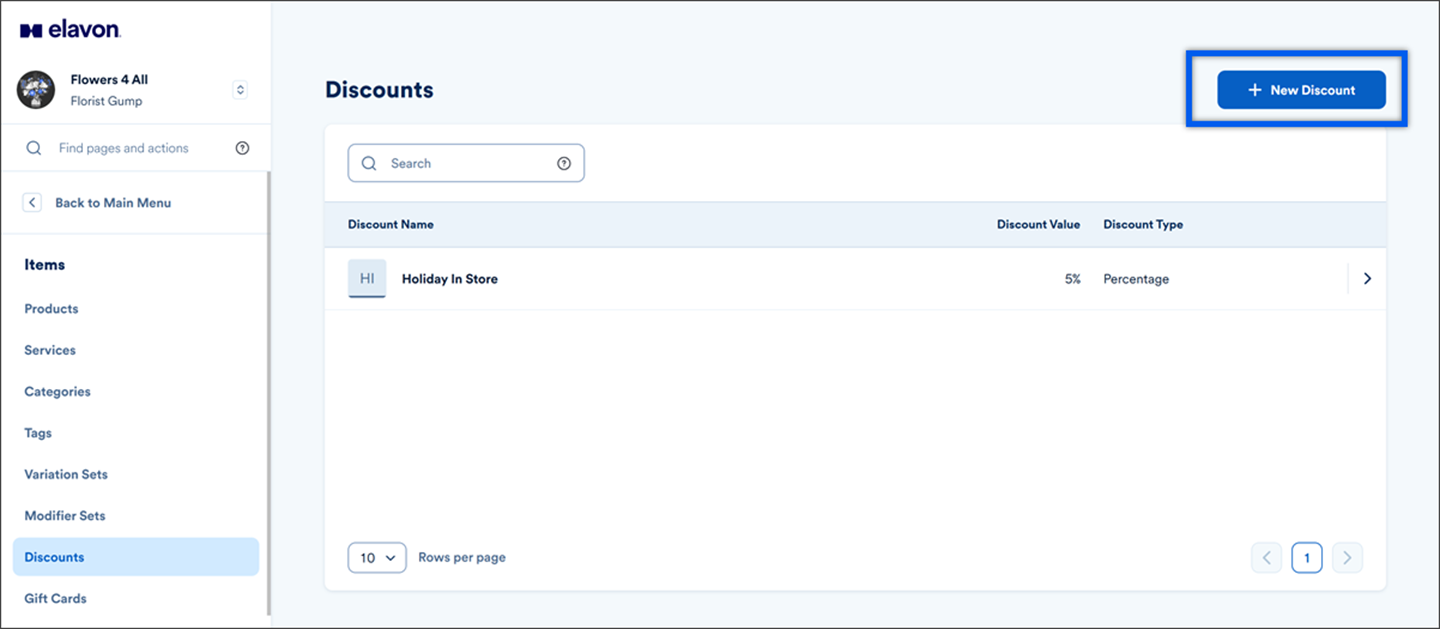
- Type the Discount Name.
- Add a Discount Code if you want to set up a promo discount that your customers can apply at checkout in your online store. Or use this code to allow employees to search and select the discount code from the Register view of your point-of-sale device.
- Select the type of discount you want to create. Based on your selection, the form options change.
- For Percentage, Dollar Amount, Price Markdown and Amount Off Total, continue to the next step and follow the remaining instructions.
- For Buy X, Get Y, continue to section Buy X, Get Y discount.
- Scroll down to the Items Eligible for Discount/Items that Activate Discount section. Add specific categories or tags that you want eligible for the discount.
- Click into the Add categories or Add tags field and select the appropriate options.
- Or you can apply the discount to all categories or to all tags by selecting the Apply discounts to all categories or Apply discounts to all tags radio button
- Scroll down to the Discount Percentage, Discount Amount, Markdown Price or Amount Off Total section (depending on your discount type). You can either enter a set amount/percentage that applies to each eligible item or set this as a variable amount that will be entered when an item is added to an order.
| Note: Variable discounts cannot be used on your online ordering website. |
- For Discount Percentage, Discount Amount, and Markdown Price, scroll down and select whether to enable Set Discount Limit which sets a maximum number of times this discount can be applied per order.
- In the last two sections, Online and In-Store Availability and Advanced Settings see the section below Additional discount settings for the final setup of your discount.
back to top
Back to top
Buy X, Get Y discount
This discount allows you to qualify certain products/services (X) to activate a discount on the same products/services or other products/services (Y). A good example of this type of discount would be “Buy one entrée, get one half off.” or “Buy one shirt at regular price, get one 50% off.”
- Scroll down to the Items that Activate Discount section. Enter the number of items the customer needs to select to activate the discount in the # of items field.
| Example: If I’m setting up a buy 1, get 1, I’d enter 1 for # of items. If I’m setting up a buy 2, get 1, I’d enter 2 for # of items. |
- Choose whether to have specific categories or tags that qualify for the “buy” part of the discount or to qualify all categories and tags.
- Click into the Add categories or Add tags field and select the appropriate options. Only the products within the categories/tags you select will activate this discount.
- Or you can apply the discount to all categories or to all tags by selecting the Apply discounts to all categories or Apply discounts to all tags radio button. This would make all the products/services within the categories/tags applicable to activate this discount.
- Scroll down to the Discount Amount section. Select either $ or % and then enter an amount. This will be the “get” part of the discount.
| Example: If I’m setting up a “buy 1 shirt, get 1 for 50% off,” I’d select % and enter 50 for the amount. |
- If you want to apply the discount to a different set of products/services than the products/services that activate the discount, toggle Change which items can receive discount on. Then, add the categories or tags that you want the “get” discount applied to.
Examples:
|
- If you want to set a limit on the number of times that this discount can be used per order or invoice, toggle Set Discount Limit to on. Then, select the number limit from the dropdown that appears.
- In the last two sections, Online and In-Store Availability and Advanced Settings see the section below Additional discount settings for the final setup of your discount.
Back to top
Additional discount settings
Regardless of the type of discount you selected, the last few options in creating a discount are the same.
- In the Online and In-Store Availability section, select whether to offer this discount online and/or in store.
- Offer Online: If enabled, the discount can be added to products or services in your online store. Set up a discount code if you will be offering this discount online and not automatically applying it to certain products/services. This way your customer can enter your discount code at checkout to apply the discount.
- Offer In Store: If enabled, the discount can be added from your point-of-sale device in your store under Register > Discounts.
- In the Advanced Settings, select your preferences for auto-applying the discount and whether it will apply to bundles.
- Auto-Apply Discount: If enabled, the discount will automatically apply to an item or order when eligible. You have additional options to choose specific days and/or specific hours that the auto discount applies.
Examples:
|
- Apply discount to items within a bundle: If enabled, items within a bundle will have the discount applied to them.
- When done select Create Discount to complete the discount set up.
Back to top
How customers see your discounts
Your discounts will show on receipts, on any customer facing displays during a transaction or on your products on your online ordering menu.
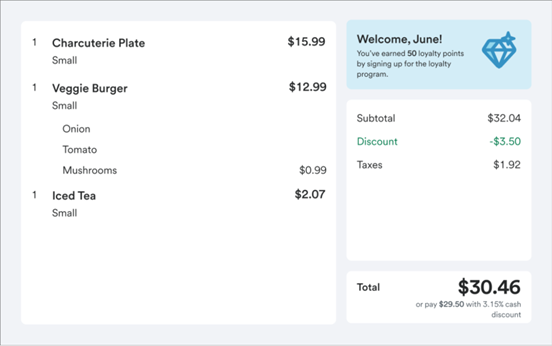
Customer facing display showing discount applied to order
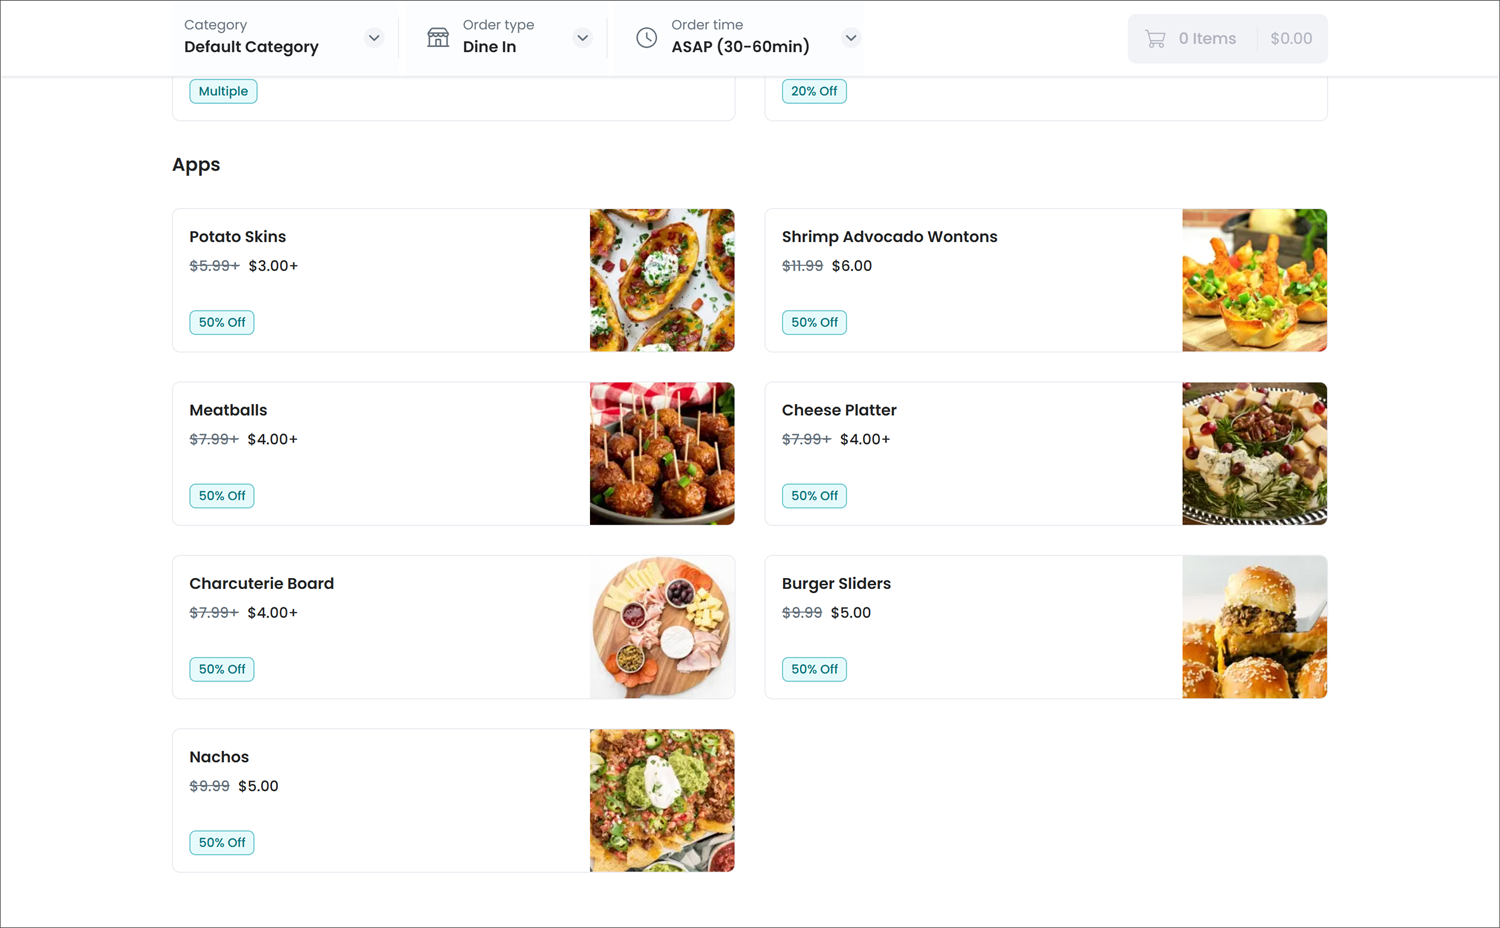
Online ordering menu showing discounted prices
Back to top
Need more help?
- talech training & device support: 1-888-995-1998
- Paytura merchant support: 1-855-4-PAYTURA or contact Paytura