Get your business online in just a few steps!
This guide walks you through:
- Setting up your services
- Enabling appointment scheduling
- Customizing your website to add your own brand
- Promotional tools to direct customers to your site
Once everything is set up, your customers can easily order from your personalized website—making it simple for them and stress-free for you.
| Note: Full access to appointment scheduling is only available for Service accounts on the Premium tier. |
In this article
Set up your services
On the point-of-sale software
On the web
Assign services to a specific employee
On the point-of-sale software
On the web
Customize your website
Add a logo
Verify business information
Add banner announcement
Add website banner
Add categories
Add your own policies
Enable appointment booking
Preview your website
Promote your website
Set up your services
Before turning your website on, make sure your services are set up the way you need. Things to consider include:
- Are your appointment booking services set up as ‘fixed time’ services? Appointments can only be scheduled for services with a fixed time service type. Regular products, bundles, assemblies, and per hour services will not be included on your website.
- Do your services all have images and clear descriptions for a better customer experience?
- Do you need to set up any online discounts or special promotions for your products? See Create Discounts on talech.com for discount types and setup.
Services can be created via the point-of-sale software or on the web. Both options are provided below.
On the point-of-sale software
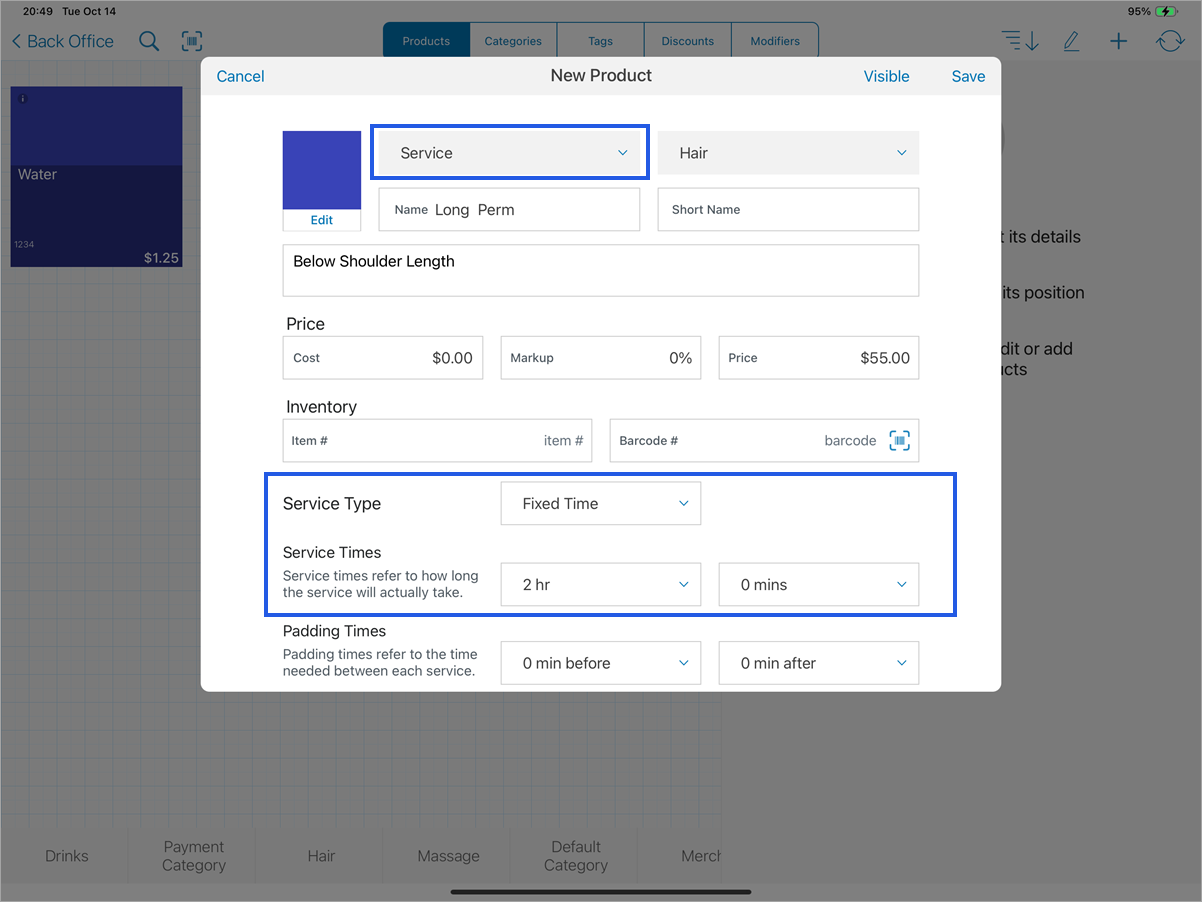
- Navigate to Back Office > Menu.
- Tap on + > Create a Product.
- Complete all the required fields and make sure:
- Product Type = Service.
- Service Type = Fixed Time.
- Service Times has a value set (padding time is optional).
- Create a clear and detailed description of the service.
Back to top
On the web
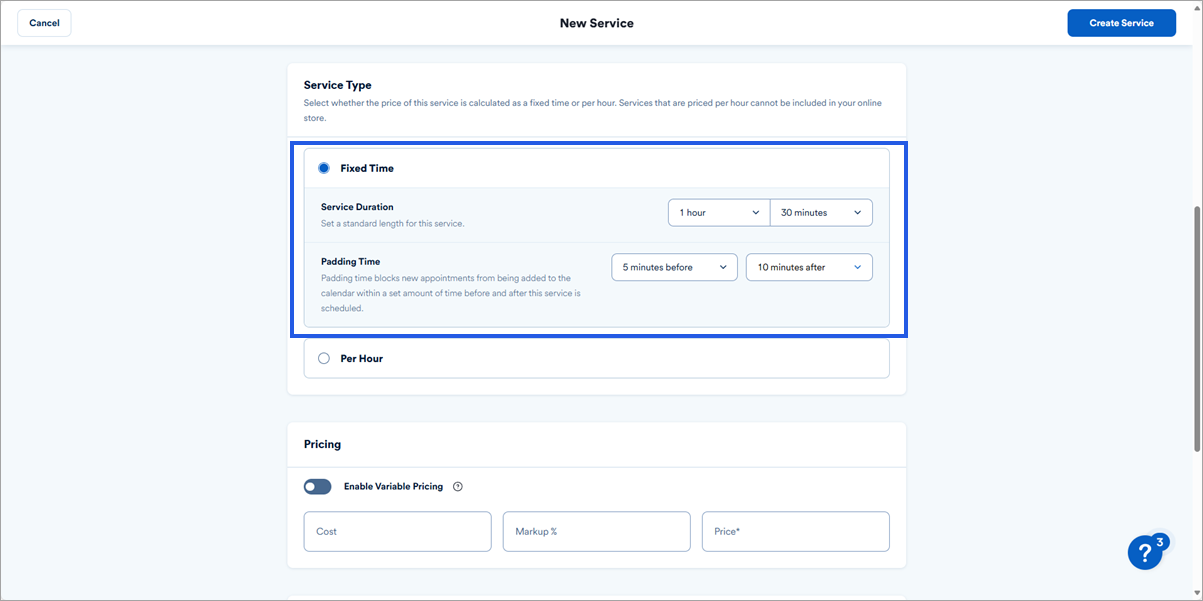
- Log in to talech.com
- Navigate to Items > Services.
- Select New Service.
- Complete all the required fields and make sure:
- Service Type = Fixed Time.
- Service Duration has a value set.
- Provide a clear description of the service along with an image.
You can find additional instructions on all the product fields in the Create Service Products on talech.com article.
Back to top
Assign services to specific employees
Assigning services to employees lets you control which services each employee can be booked for and when they are available for appointments. You assign specific services to an employee and then set their service‑booking availability hours. Customers can only book those services with that employee during the times you’ve made available, helping ensure accurate bookings and better schedule control.
On the point-of-sale software
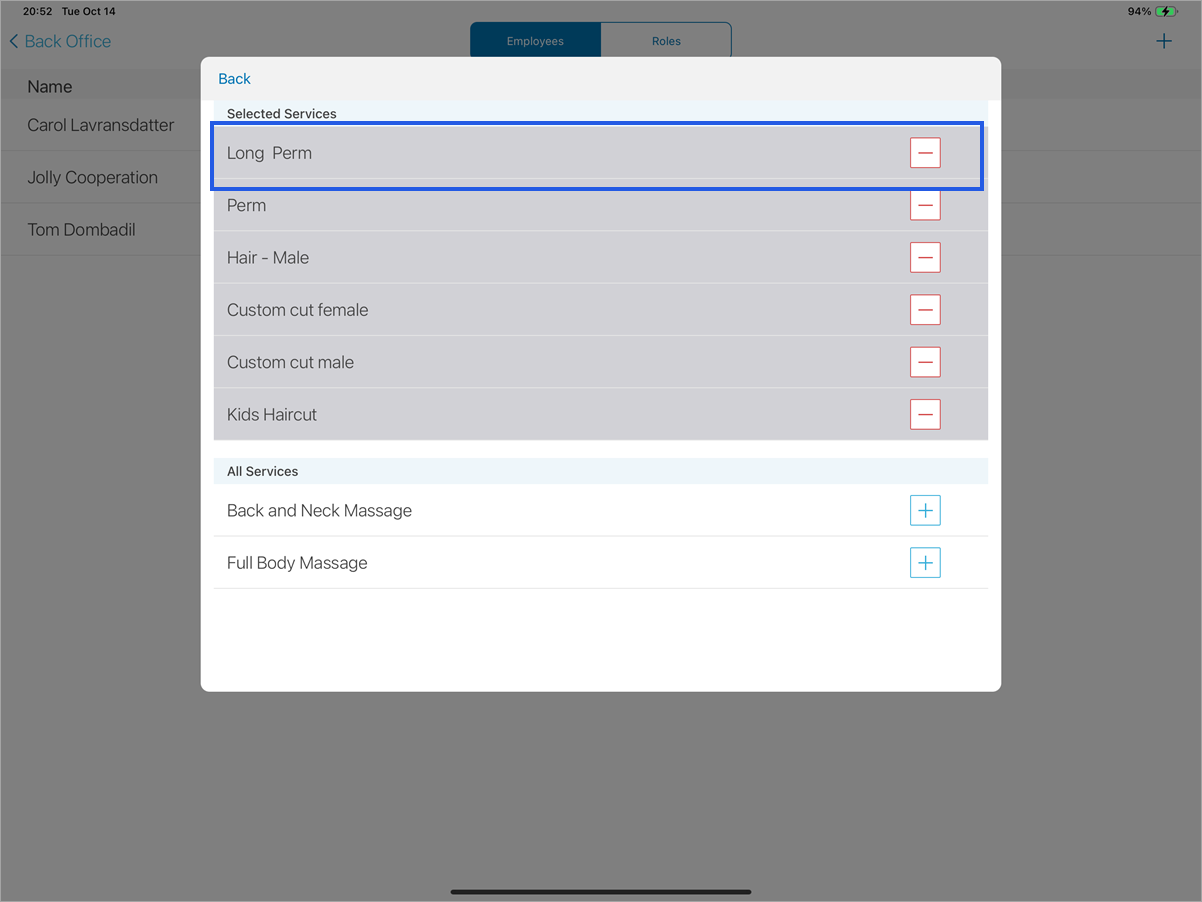
- Login to the point-of-sale software.
- From the Dashboard, navigate to Back Office > Employees.
- Select an employee from the list.
- Select Roles at the bottom of the screen.
- Select Edit next to their assigned role.
- Select Services.
- Press the + button next to the service name you wish to add.
- Select Back (may require multiple times) and select Save.
Back to top
On the web
- Log into talech.com.
- Navigate to Employees > Employees.
- Select an employee to edit their profile.
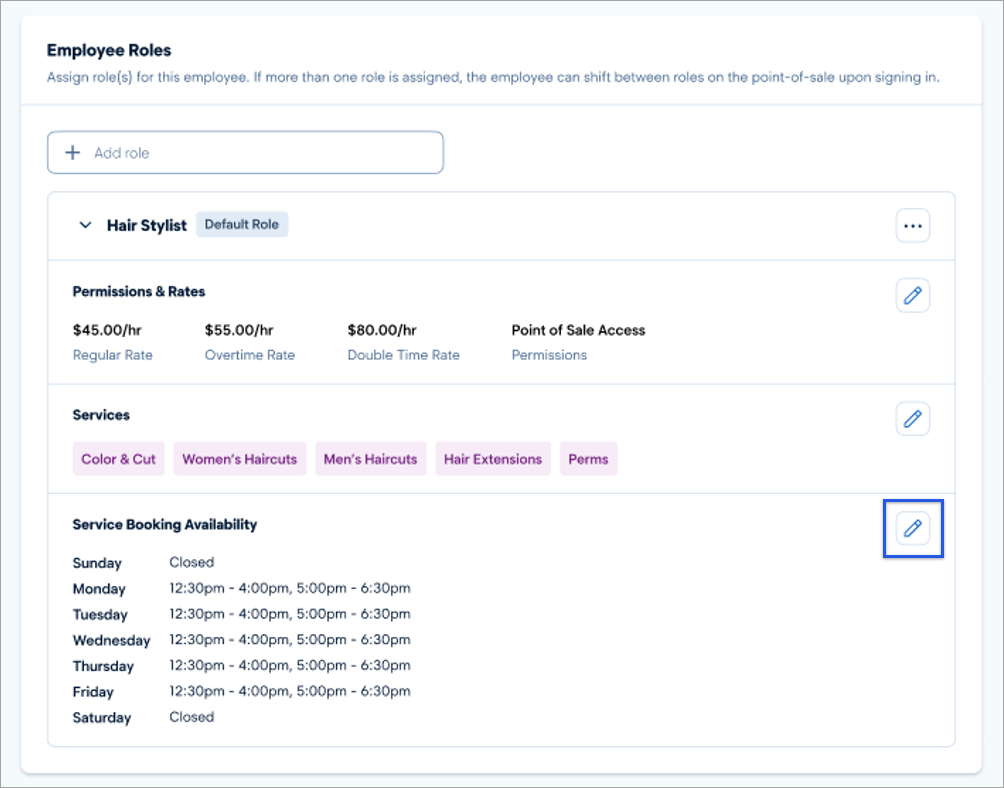
- In the Employee Roles section, click the role to expand the details.
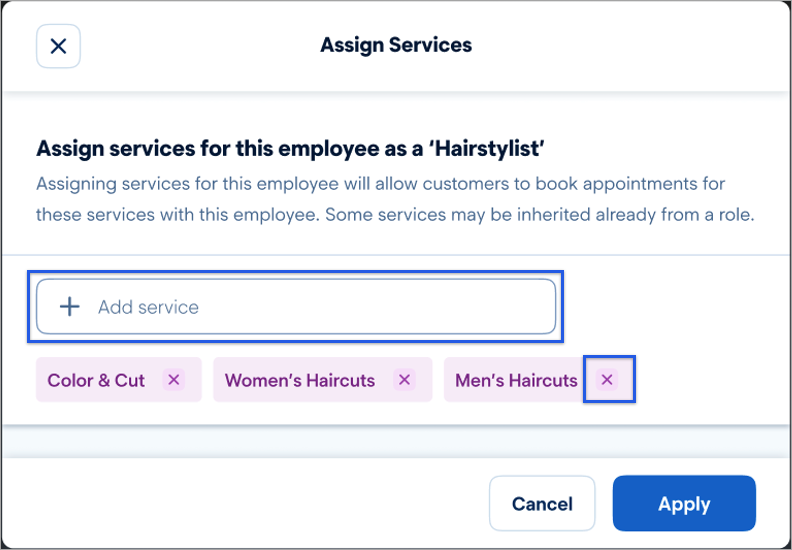
- All the current services assigned to this employee are displayed in the Services section. To edit the services or add new, click the pencil icon.
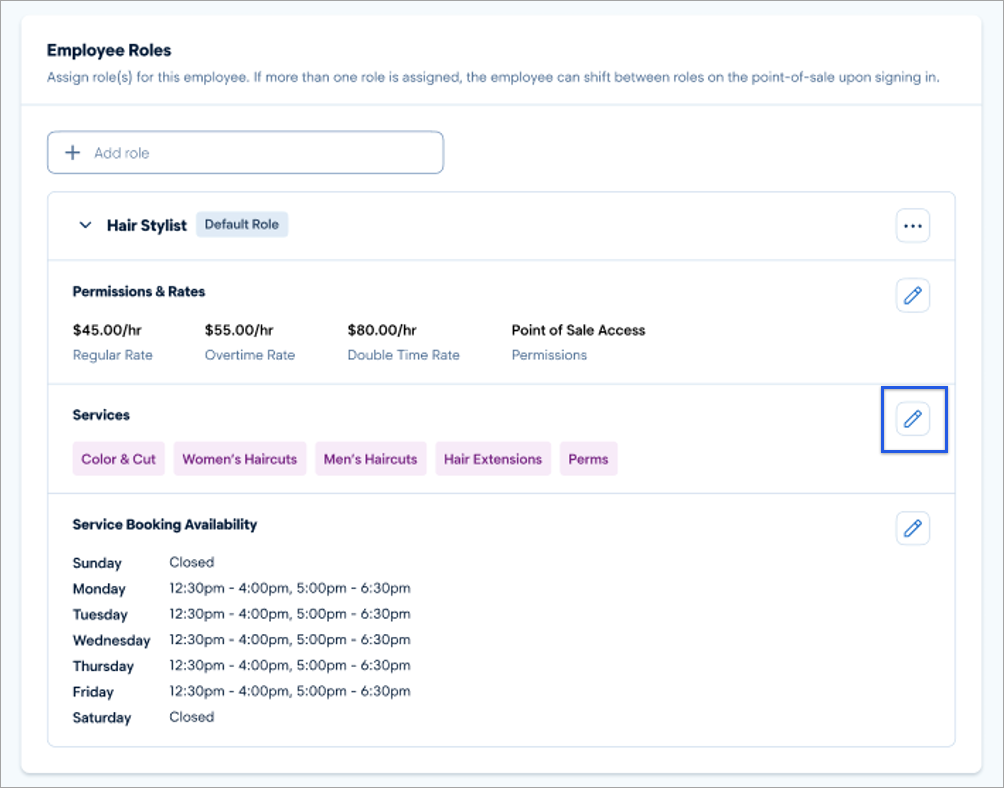
- In the Assign Services menu that appears, you can add or remove services.
- Add a service by clicking in the Add service field to view your existing services.
- Remove a service by clicking the x next to an assigned service.
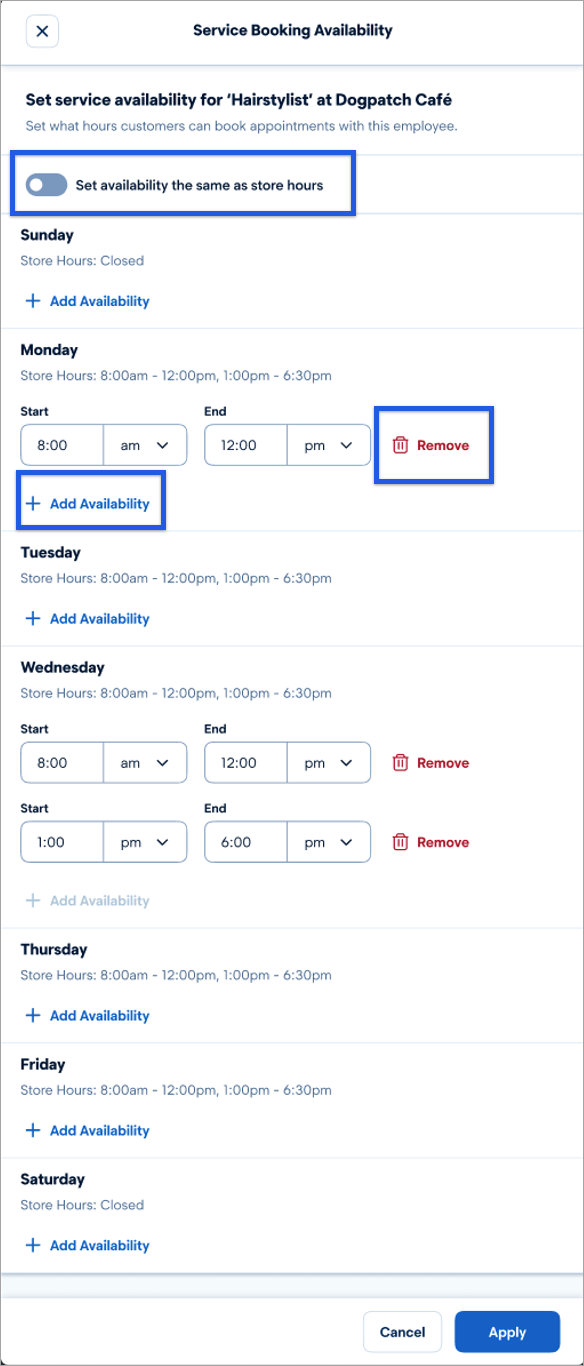
- In the Service Booking Availability section, click the pencil icon to edit the hours the employee is available for service booking.
- You can either set the availability to match your store hours or you can set custom availability hours.
- To set the availability to match your store hours, toggle Set availability the same as store hours to ON.
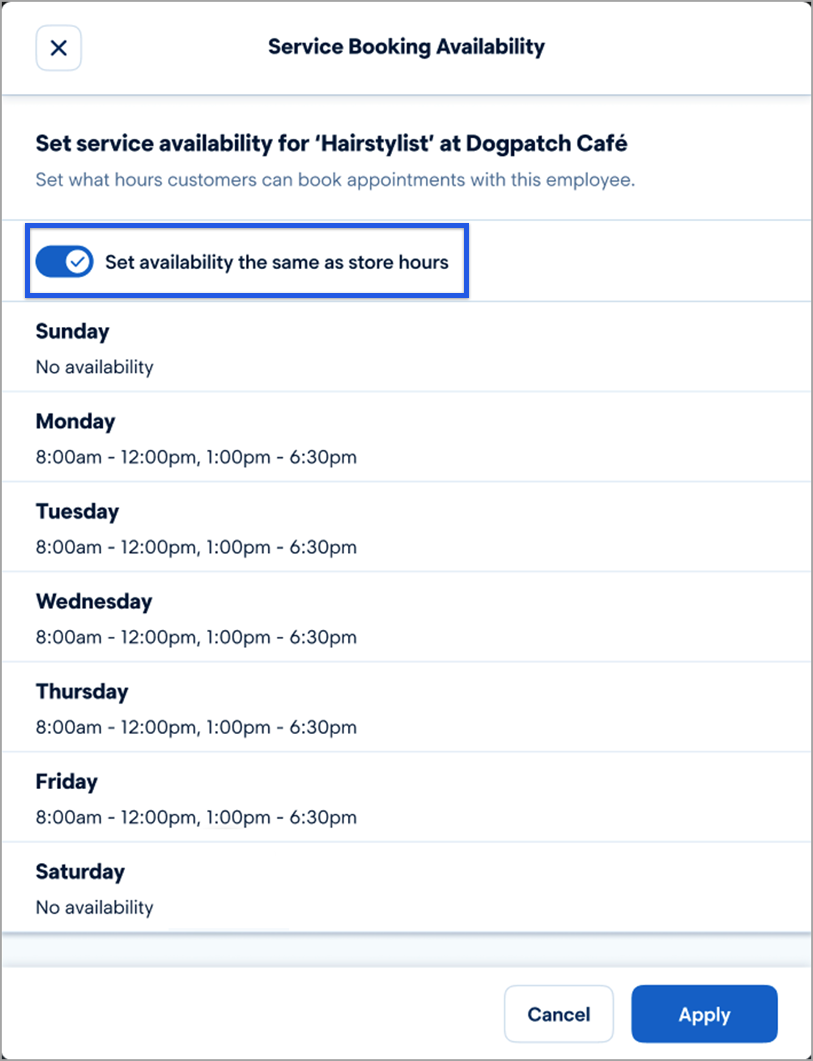
- To set customer hours for availability, toggle Set availability the same as store hours to OFF.
- Click Add Availability to enter additional hours for service booking.
- Click Remove to delete hours from the available service booking.
- Once done, click Apply.
Back to top
Customize your website
Add a logo
This is an optional step, but it will get your brand in front of your customers by placing your logo on your website.
- Navigate back to the Home page and select Settings > Business Information.
- In the Business Logo section, select Upload Image.
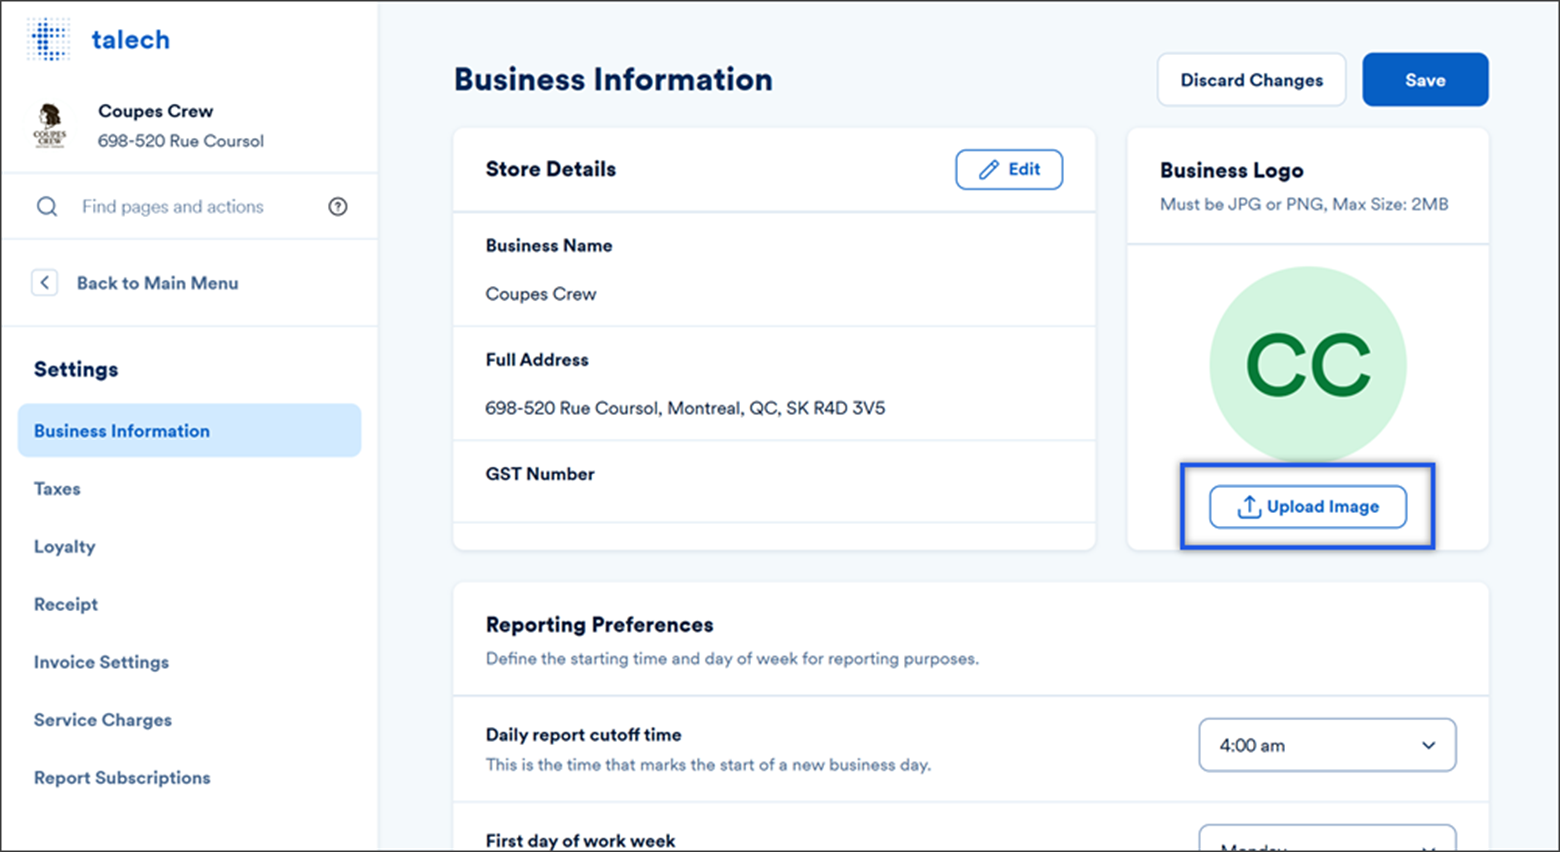
- Select an image in the following formats .jpg or .png. Maximum size of the image is 2MB.
- Use the edit logo tool to crop, resize or rotate your image. Once done select Apply.
Verify business information
Scroll down to the hours and contact info sections to make sure your business information is accurate, including your address, phone number and business hours.
- Review the Store Details, Store Hours, and Contact Info sections. If changes are required, select Edit and update accordingly.
- Once done, select Save at the top right.
Add banner announcement
This is optional, but allows you to add a notification to the top of your site to communicate important messages to your customers such as discounts, deals, upcoming changes, etc.
- Navigate to Website > Website Settings.
- Scroll down to the Banner Announcement section and toggle Enable banner announcement to on.
- Add your message in the Banner Header and Banner Message fields.
- Select Preview Banner to see how it will appear on your site.
- Scroll to the top and select Save.
Add a website banner
This is optional but will add an image to the top of your online ordering website.
- Navigate to Website > Website Settings.
- Scroll down to the Background Image section. Select Upload Image. Your image must be a .jpg or .png and not exceed 2MB.
- Use the edit tool to crop, resize or rotate the image. Select Apply when done.
- Scroll to the top and select Save.
Add categories
- Navigate to Website > Website Settings.
- Scroll down to the Menu Categories section and select the categories you want to have available on your website. Selecting a category adds all the services in that category to your catalog on your appointment booking website.
- Scroll to the top and select Save.
Add your own policies
You can customize your own policies to suit your business’ needs.
- Navigate to Website > Policies.
- Each policy option is a tab across the top. There is an open text field where you type your custom policy text and a toggle to display the policy on your website on or off.
- Once done making changes, select Save.
Back to top
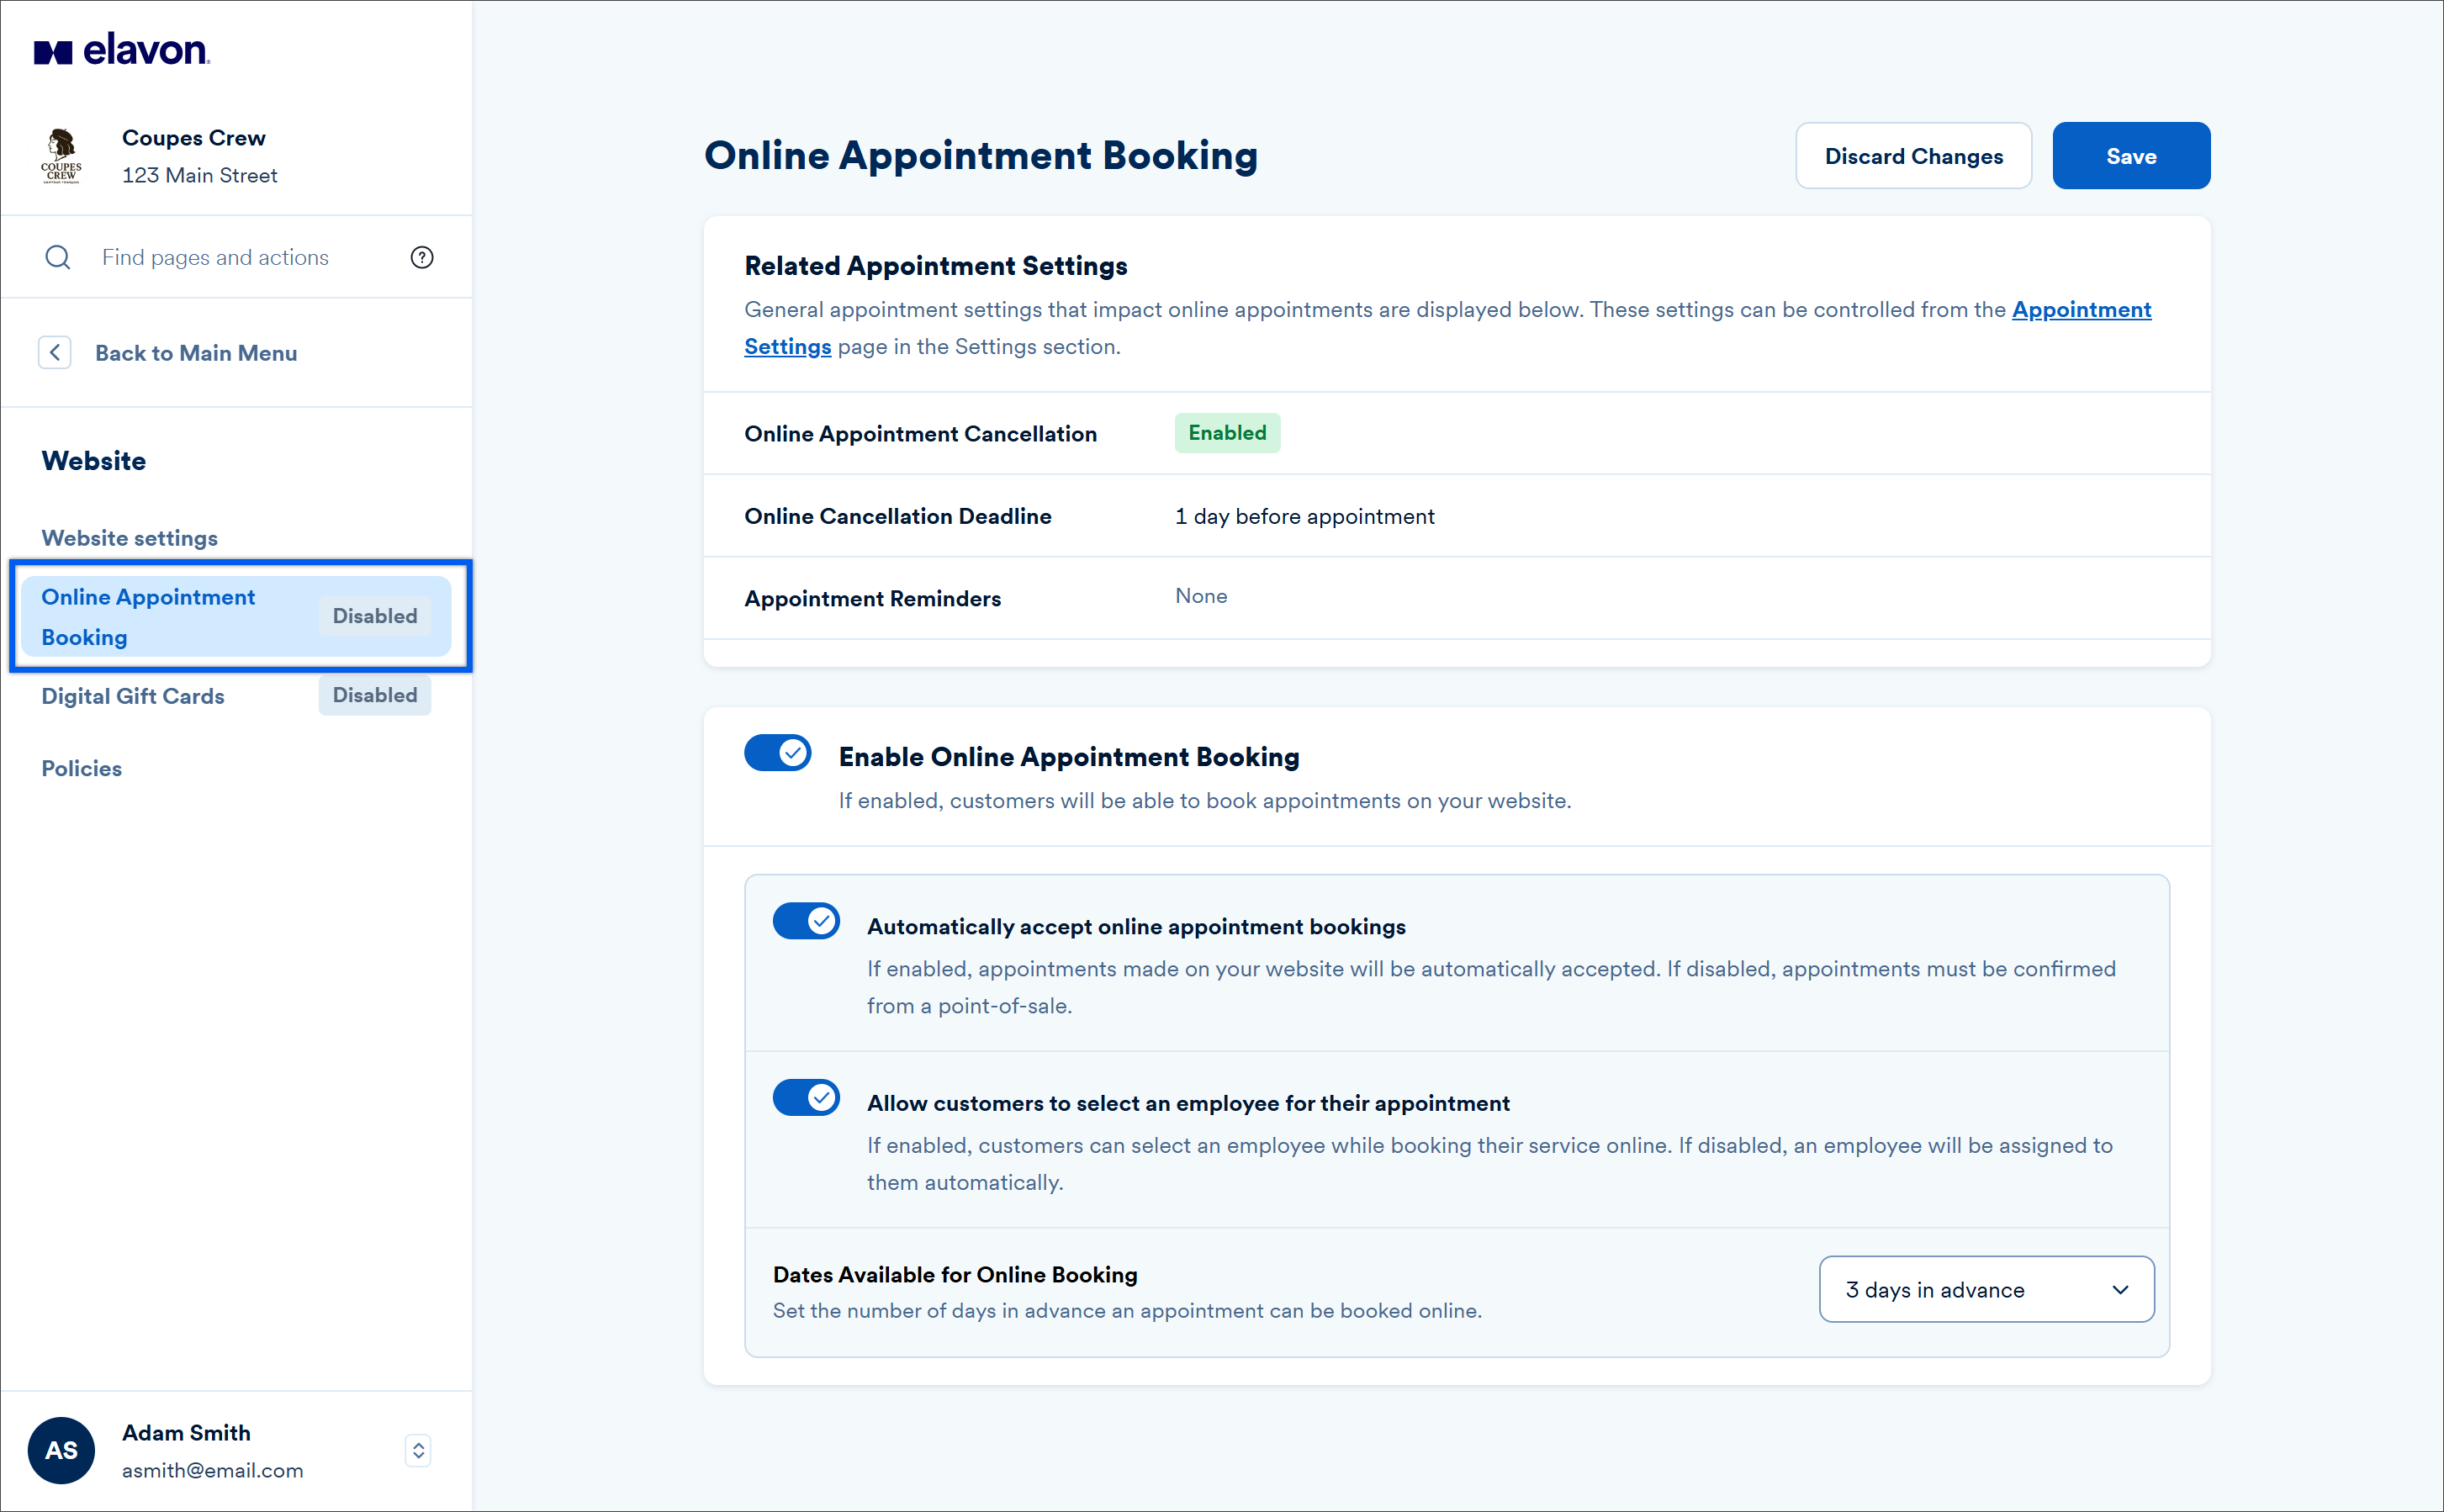
Enable appointment booking
With everything else set up, you are now ready to turn on your appointment booking site. If not already enabled, appointment booking is turned on from talech.com. For a full breakdown of the appointment scheduling settings, see article Appointment Scheduling Settings.
- Navigate to Website > Online Appointment Booking.
- Toggle on Enable Online Appointment Booking.
- Click Save in the top right.
Back to top
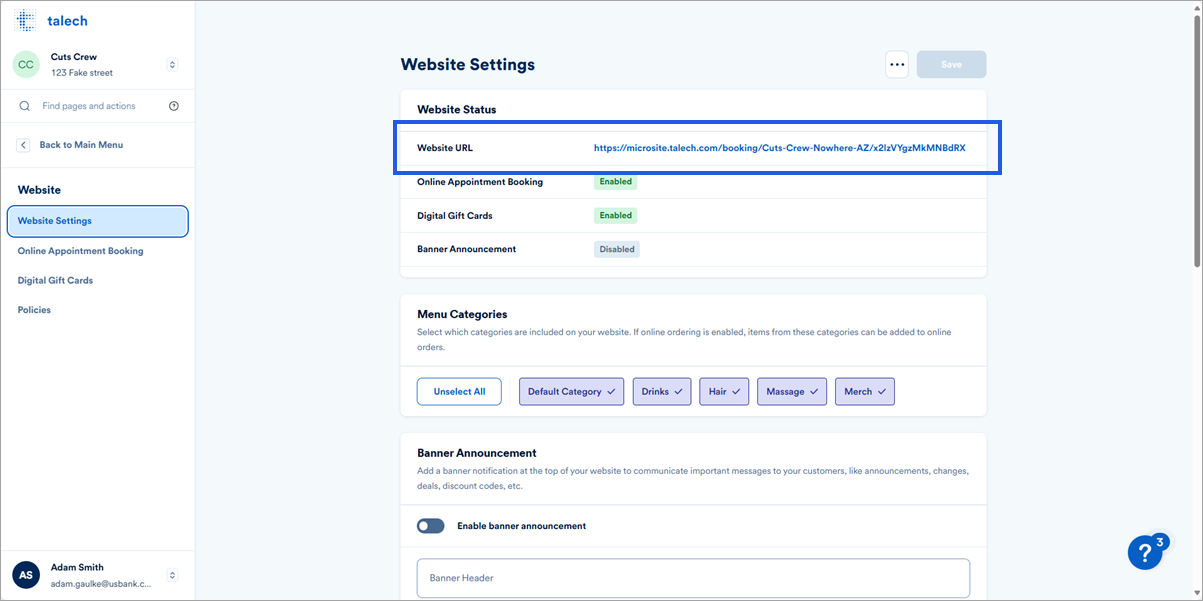
Preview your website
Preview your website to see what your customer sees when scheduling an appointment online.
- Navigate to Website > Website Settings.
- Click the link in the Website URL to open your customer-facing site.
Back to top
Promote your website
From Website > Website Settings use our promotion tools to direct customers to your website.
Scannable code
Download the custom scannable code to be added to any advertising, promotional flyers or social media to direct potential customers to your website.
HTML link
Copy the HTML link to your website to be shared n another website or social media page.
Differences between iPad and Android Devices
The Calendar/Appointments view is only currently available only on iPad devices. Android devices are not able to Complete, Cancel, or Schedule appointments. However, in Android, you will still be able to:
- Create Service Products
- Sell Service Products in the Register
- View Appointment Related Reports
- Assign Service Products to Employees
Back to top
 |
Still have questions? Or want to learn more? Schedule a call with our talech Onboarding Post Go Live Services group. Let us help you make the most of this feature to benefit your business! Click here to schedule a call: https://go.oncehub.com/talechpostlivehelp. |
Need more help?
- talech training & device support: 1-888-995-1998
- Paytura merchant support: 1-855-4-PAYTURA or contact Paytura